Friday, June 5, 2020

How we can use SharePoint framework client side webpart in classic pages?

Ans 
Add SharePoint framework client web part to classic web part page

First, we need to add the SharePoint framework client web part to the SharePoint classic site.

Open the SharePoint site and then click on the Settings icon and then Add an app.

You can see the spfx client-side web part in the site content. Click on the web part to add the web part to the SharePoint classic site.
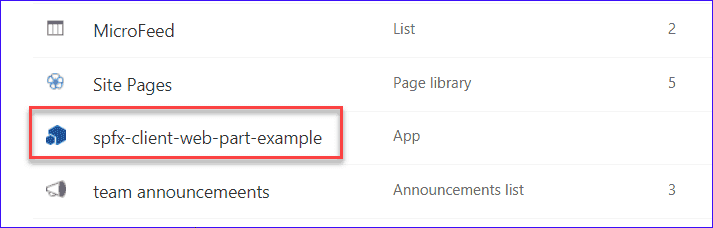


Once the client-side web part added successfully, Open a web part page and click on Add a web part. Then you can see in the Other web part category, you can see the spfx client-side web part.


Once you add the sharepoint framework client web part to the SharePoint classic web part page, it looks like below:

What is Redux?

Ans
  • Redux is a predictable state container for JavaScript applications. 
  • It helps you write applications that behave consistently, run in different environments (client, server, and native), and are easy to test.
  • Simply put, Redux is a state management tool. While it’s mostly used with React, it can be used with any other JavaScript framework or library. 
  • It is lightweight at 2KB (including dependencies), so you don’t have to worry about it making your application’s asset size bigger.
  • With Redux, the state of your application is kept in a store, and each component can access any state that it needs from this store.

Thursday, June 4, 2020

What is the difference between local workbench and Actual site workbench?

Ans
A Workbench is a tool where the developer can host and test their SharePoint Framework solution.

The Workbench is reactive and will automatically reload artifacts when the developer saves a file so that developers can see and test the solution quickly.

There are two versions of the Workbench.
1) Hosted outside SharePoint
2) Hosted inside SharePoint
  •  One is outside of SharePoint, hosted locally on the development machine that runs offline without SharePoint access and SharePoint data.
  • This allows the team and designers to build and design solutions with mock or fake data to focus on the user interface.
  • This enables us to quickly test the web part without deploying in SharePoint.
  • This includes the client-side page and the client-side canvas in which we can add, delete, and test our web part in the development phase. 
  • When we execute the “gulp serve” command the local workbench starts. This command executes a series of gulp tasks to create a local, node-based HTTPS server on localhost:4321 and launches our default browser to test web parts from our local dev environment.
  • https://localhost:4321/temp/workbench.html -This HTML page is served from the local file system by Node.js and is loaded in the browser.


The second version is hosted inside SharePoint and is used when we need to test and verify the SharePoint Framework solution by using real SharePoint data and context.

URL - (Our site URL)/_layouts/15/workbench.aspx 

How you handle multiple textbox values on single handler in react js?

Ans
You can control the values of more than one input field by adding a name attribute to each element.

When you initialize the state in the constructor, use the field names.

To access the fields in the event handler use the event.target.name and event.target.value syntax.

To update the state in the this.setState method, use square brackets [bracket notation] around the property name.


class MyForm extends React.Component {
  constructor(props) {
    super(props);
    this.state = {
      username: '',
      age: null,
    };
  }
  myChangeHandler = (event) => {
    let nam = event.target.name;
    let val = event.target.value;
    this.setState({[nam]: val});
  }
  render() {
    return (
      <form>
      <h1>Hello {this.state.username} {this.state.age}</h1>
      <p>Enter your name:</p>
      <input
        type='text'
        name='username'
        onChange={this.myChangeHandler}
      />
      <p>Enter your age:</p>
      <input
        type='text'
        name='age'
        onChange={this.myChangeHandler}
      />
      </form>
    );
  }
}

ReactDOM.render(<MyForm />, document.getElementById('root'));

How we can get current site url in Sharepoint framework?

Ans   To get the URL of my SharePoint site.

this.context.pageContext.site.absoluteUrl

Why we use constructor() and super() in class?

Ans 
constructor() 
  • The constructor is a method that’s automatically called during the creation of an object from a class.
  • It can be used to bind event handlers to the component.
  • It can be used for initializing the local state of the component.
  • The constructor() method is fired before the component is mounted.
  • When you call the super() method, it calls the constructor of the parent class which in the case of a React component is React.Component
super()

super() is called inside a react component only if it has a constructor. For example, the below code doesn't require super:

class App extends React.component {

    render(){

        return <div>Hello { this.props.world }</div>;

    }

}

However if we have a constructor then super() is mandatory:


class App extends React.component {

    constructor(){

        console.log(this) //Error: 'this' is not allowed before super()


    }

}

The reason why this cannot be allowed before super() is because this is uninitialized if super() is not called. However even if we are not using this we need a super() inside a constructor because ES6 class constructors MUST call super if they are subclasses. Thus, you have to call super() as long as you have a constructor. (But a subclass does not have to have a constructor).

We call super(props) inside the constructor if we have to use this.props, for example:

class App extends React.component{

    constructor(props){

        super(props);

        console.log(this.props); // prints out whatever is inside props


    }

}


What is props and state in react

Ans:
Props

  • The props are read-only properties we set values to when we call our React component. 
  • They are a way to transfer information from the parent component to the child. 
  • We can also use them in your React component to control how it behaves in different situations – when different kind of data is passed down to it.
State

  • The state can also be used for controlling, e.g., how our component is rendered. 
  • What makes state different from props is that we can change its values.
  •  We typically initialize state with null values in the constructor and later change the values when something happens in the component to reflect that change – the new state of the component.

Remember when  render() method is executed whenever the props or state changes? we can change the state by calling the this.setState() method, and that will make our render method execute again, taking into account the new state values. There is also another way to set state: this.state = { ... } but that should only be used in the constructor as it does not trigger the render method execution.