| Functional component | Class Component |
| 1.A functional component is just a plain JavaScript function which accepts props as an argument and returns a React element. | 1.A class component requires you to extend from React.Component and create a render function which returns a React element. This requires more code |
| 2. you cannot use setState() in your component. | 2.you can use setState() in your component. |
| 3. It contains less lines of code | 3. It contains more lines of codes |
| 4. It accepts only props | 4. It accepts both props and state |
| 5. syntax import React from 'react'; import ReactDOM from 'react-dom'; function Welcome(props){ return <h1>Hello,{props.name}</h1> } ReactDOM.render(<Welcome />,document.getElementById('root')); | 5. syntax import React from 'react'; import ReactDOM from 'react-dom'; class Welcome extends React.Component{ render(){ return <h1>Hello,{this.props.name}</h1> } } ReactDOM.render(<Welcome />,document.getElementById('root')); |
Friday, May 29, 2020
Difference between Functional and Class Components in react.js ?
What is folder structure of SharePoint Framework (spfx) webpart and what are the main files used in it.
Ans:-
Folders in Solution

src
- The code files are stored inside this folder
- Includes web part code file (HelloWorldWebPart.ts),
configuration JSON file (HelloWorldWebPart.manifest.json)
lib
- It contains processed code which can be bundled and
distributed
- All TypeScript files compiled to JavaScript files are
stored in this folder
dist
- Contains final distributed files
- Includes JavaScript bundle file –
HelloWorldWebPart.bundle.js
config
- Contains a set of JSON files for configuration
- Configuration files vary from bundling to packaging
node_modules
- Contains JavaScript modules downloaded by Node.js
typings
- Contains TypeScript typings files for various libraries
- Typings supports IntelliSense for JavaScript libraries
SharePoint
- Contains the final .spapp file post execution of ‘gulp
package-solution’ command
Major
Files in Solution
Web Part Class
(HelloWorldWebPart.ts)
This defines the entry point of the
web part. In our solution, we have only one web part class -
HelloWorldWebPart.ts located at src\webparts\helloWorld folder. The web part
class extends BaseClientSideWebPart. Each client-side web part should extend
from BaseClientSideWebPart, which provides basic functioning for the web part.
Property Type Interface (IHelloWorldWebPartProps.ts)
The interface resides in the same web part file. The web part class accepts
the property type of interface. This interface is used to define our own custom
properties for the web part. We can add any of the below type of properties.
- Button
- Checkbox
- Choice group
- Dropdown
- Horizontal rule
- Label
- Link
- Slider
- Textbox
- Multi-line Textbox
- Toggle
- Custom
The properties can be used in web
part as below.
- <p class="${ styles.description }">${escape(this.properties.description)}</p>
WebPart Manifest
HelloWorldWebPart.manifest.json
holds the metadata of web part such as display name, description, icon,
version, id.

Config.json
The configuration file contains the bundling information, the
components used in the solution and entry point of the solution.
This file also records the external references (for e.g.
jQuery) and its dependencies. Also, references to localization resources are
stored in this file.

deploy-azure-storage.json
This file is used while deploying the client-side web part to
Azure CDN. This file contains Azure storage account details.

package-solution.json
This file contains solution path configurations.

gulpfile.js
Defines gulp tasks to run.
package.json
Defines JavaScript library dependencies.
tsconfig.json
Defines settings for TypeScript compilation
Summary
Yeoman generators help to generate SPFx client-side web part
solution. The solution has a predefined structure. Each folder and file has its
own significance. It is important to understand the role of each file for
better development.
Thursday, May 28, 2020
What are steps to configure SharePoint framework?
Ans:-
Step 1 - Download and Install Node JS LTS Version 10
Step 2 - Installing Visual Studio Code
We can use any code editor to develop SPFx solution but mostly it's used in Visual Studio code. Download Visual Studio code stable version from the below link.
https://code.visualstudio.com/ -
Step 3 - Install Yeoman and Gulp
- These are Node JS based tools which help in creating, building, and debugging SPFx solutions.
- Go to Node JS command prompt
- Enter the below command
- It will download yeoman and gulp packages, we are using -g parameter so that it would be installed globally across your Node JS environment.
Step 4 - Install SharePoint Yeoman generator.
- Next, we will install the SharePoint Yoeman generator which will help in creating the SPFx solution project structure.
- Run the below command in Node JS command prompt.
npm install -g @microsoft/generator-sharepoint
Step 5 - Trusting self-signed Developer certificate
SharePoint local server to test web parts uses HTTPS. This is developed using a self-signed developer certificate. So we need to trust the self-signed developer certificate for our development environment.
This needs to be done only once, but it would need to run on SPFx project root folder. So you can do this once we create our first Hello world client-side web part
- Run the below command in Node JS command prompt.
gulp trust-dev-cert
Step 6 - Create Hello World Web part
- Go to Node JS command prompt, go to the required path where you wanted to create the SPFx project.
- Use 'md helloworld-webpart' command to create a directory and go to that directory using 'cd helloworld-webpart'
- Once in your folder, use below command to create a new SPFx project
- yo @microsoft/sharepoint
- It will take you to some questions one by one to create a required project based on your requirements.
- Now let's run 'gulp trust-dev-cert', you will be asked to install a certificate. Click yes
Step 7 - Preview web part in local workbench.
- Run the below command.
gulp serve
- It should open local workbench like below, click on Add icon and add Hello world web part to the page.
What is the life cycle of SharePoint framework?
Ans:- Once SPFx is loaded, it starts to initialize all the web parts on the page, indicated by the OnInit() event. Then when it's time to paint the web part on the page, the render() method is called.
- OnInit()
- render()
What is SharePoint client side webpart?
Ans:- Client-side web parts are client-side components that run inside the context of a SharePoint page. Client-side web parts can be deployed to SharePoint Online, and you can also use modern JavaScript tools and libraries to build them.
Client-side web parts support:
- Building with HTML and JavaScript.
- Both SharePoint Online and on-premises environments
What is SharePoint Framework(spfx) and its key features?
Ans:- The SharePoint Framework (SPFx) is a page and web part model that provides full support for client-side SharePoint development, easy integration with SharePoint data, and support for open source tooling. With the SharePoint Framework, you can use modern web technologies and tools in your preferred development environment to build productive experiences and apps that are responsive and mobile-ready from day one. The SharePoint Framework works for SharePoint Online and also for on-premises (SharePoint 2016 Feature Pack 2 and SharePoint 2019).
Key features of the SharePoint Framework include the following:
- It runs in the context of the current user and connection in the browser. There are no iFrames for the customization (JavaScript is embedded directly to the page).
- The controls are rendered in the normal page DOM.
- The controls are responsive and accessible by nature.
- It enables the developer to access the lifecycle in addition to render, load, serialize and deserialize, configuration changes, and more.
- It is framework-agnostic. You can use any JavaScript framework that you like: React, Handlebars, Knockout, Angular, and more.
- The toolchain is based on common open source client development tools such as npm, TypeScript, Yeoman, webpack, and gulp.
- Performance is reliable.
- End users can use SPFx client-side solutions that are approved by the tenant administrators (or their delegates) on all sites, including self-service team, group, or personal sites.
- SPFx web parts can be added to both classic and modern pages.
Monday, May 18, 2020
What is Team and Communication site?
Ans:- Modern SharePoint sites come in two variants,
- Team Site
- Communication site.
A Team site is really more for a group of people to collaborate, share documents, track events, manage tasks.
A Communication site to share important information within your organization, keep track of topics, events or projects. Communication site provides three templates:-
- Topic,
- Showcase,
- Blank.
Classic SharePoint vs Modern SharePoint?
Ans:- Classic
SharePoint vs Modern SharePoint
|
Key Feature |
Classic SharePoint |
Modern SharePoint |
|
Custom
master page and page layouts |
Classic
SharePoint we able to set custom master page and page layouts by Out of Box
SharePoint. |
Modern
SharePoint does not support any custom master page and page layouts. Modern
SharePoint as its own layouts that fully responsive including all modern web parts. |
|
Responsiveness |
Classic
SharePoint is partially responsive including all classic web part. Classic
SharePoint is not mobile friendly. |
Modern
SharePoint comes with full responsiveness even all modern web parts. Modern
SharePoint comes with Team sites, modern list and library structure and
site pages. Modern SharePoint support all modern devices including mobiles,
tablets and surface devices. |
|
Secure
and Faster |
In Classic SharePoint
user have permission to add custom code (javascript), also have script editor
and content editor web part that render on the server side that’s why it
takes time to load on the browser with additional security issues. The user can also edit
pages in SharePoint designer. |
Modern SharePoint doesn’t allow any custom code even it does
not provide any script editor web part for custom code that’s why is more
secure and loads faster. |
|
List and Library improvements |
Classic SharePoint list and library level configuration are
most complicated task there is no easy interaction with these controls.
Classic SharePoint has ribbon containing all list and library configuration. |
Modern SharePoint has
many lists and library level improvements including easier filtering,
conditional formatting, and attention views, which have easy interaction. The modern list also
addressed 5000 list items threshold issues problem by automatically indexing. Modern SharePoint does
not have SharePoint ribbon so we miss some cool features that present in
classic SharePoint including save as template, export to excel etc. |
|
New feature |
Classic SharePoint also supports these modern services but
there are some limitation and configuration issues which are not in Modern
SharePoint case. |
Modern SharePoint comes with very cool features that easy to
configure and share data between these services including Flow, Forms,
PowerApps, PowerBI etc. with responsiveness. |
|
AlternateCSSUrl web property |
Supported |
Not supported |
|
Minimal Download Strategy (MDS) |
Supported |
Not supported |
|
Web part supports |
All SPFx web part is supported in Classic pages. |
We can’t use already created “classic” web parts on “modern”
pages but vice-versa are worked. |
|
Development Strategy |
For classic SharePoint
Microsoft give feature called SharePoint Add-in in the year 2013 for web part
creation. SharePoint add-in
requires a lot of infrastructure and efforts to create add-in more it comes
in two flavors: SharePoint-hosted and provider-hosted. SharePoint add-in runs
in an iframe. |
For modern SharePoint
pages, Microsoft gives feature called SharePoint Framework (SPFx) in the year
2016 for web part creation. SharePoint framework
relly on open source tooling which required fewer efforts. SharePoint framework
does not run in an iframe that’s why it capable of running in classic
SharePoint site pages also. |
|
Development Customizations |
Classic web parts
support JSLink for list/form customizations. Supports display
templates, master pages offer search result rendering customizations |
Modern web parts not
supported JSlink in list/form customization. Modern SharePoint
development is client side using JavaScript frameworks like Angular JS, React
JS, Node etc. all these open sources. SharePoint framework (SPFx)
are used to create modern web parts and extensions SPFx extensions can
help for Application Customizers, Field Customizers, and Command Sets. |
|
Tools for Development Customizations |
SharePoint Designer Infopath SharePoint Workflows Sandbox Solution CustomActions |
SharePoint
Framework(SPFx)- Web part and Extention PowerApps Microsoft Flow |
|
SharePoint Search |
The ”classic” search
experience can be found in SharePoint on-prem as well as in Office 365.
”Search Center” provides results from the search index. Full control on the
searchable strategy, define what results to be displayed with complete search
customization |
”Modern” search
experiences have been popping up in Office 365 only. Displaying relevant
content, moreover, suggesting what is supposed to be useful to the current
user but the modern search experience UI is not customizable. |
|
SharePoint Ribbon |
Present |
Not present |
Limitation
of Modern SharePoint:
- 1. Modern SharePoint has come for Office 365 online only. not for
on premises.
- 2.
For SharePoint Framework (SPFx) to build and deploy client-side
web part so you need Office 365 tenant admin permission to create an
app catalog site.
- 3.
No support for master pages and page layouts.
- 4.
No active SharePoint ribbon in modern SharePoint.
- 5.
Custom CSS via AlternateCSSUrl web property not supported
- 6.
Minimal Download Strategy (MDS) not supported
- 7.
Missing script editor and content editor web part.
What are zones in SharePoint Web Application?
Ans:- Zones provide different logical paths (URL's) to access the same web application. Multiple zone usage allows implementing different access and policy conditions for users. Zones provide a way of using different authentication methods for the same site. In SharePoint, each web application has 5 zones:
- Default
- Intranet
- Internet
- Custom
- Extranet
Zones provide a method to partition users by:
- Authentication type (Windows Authentication/Kerberos)
- Network zone (Intranet/Internet/Extranet)
- Policy permissions (Allow or Deny Read-Write access)
Whenever a web application is created, it is created in the Default zone (by default).We will have to extend the web application to other zones if needed. We can implement any of these zones for the web application. You cannot have the same zone twice for the same web application. If you check in IIS Manager, each zone implementation of the web application would have its own IIS web site. But don’t forget that in actual, all these refer the same Sharepoint site. You might be extending your website to create a new IIS web application, but for Sharepoint it is just another URL pointing to the same web application with the same set of site collections. Now by extending a web application to multiple zones, users access the same site through separate and independent URLs, each having its own web.config file. Each zone is configured with its own load-balanced URL (protocol, host header, and port).
So in effect, a content change to any of these sites means, it will reflect in all zones. This is because the all these zones are getting data from the same content database.
How to resolve SharePoint list view threshold error: “The view cannot be displayed because it exceeds the list view threshold…”
Ans:- SharePoint lists have a default limit of 5,000 items per view. But lists can contain 30 million items (just not all available in one view). Since you’re reading this, perhaps you’ve already learned this from an error message such as:
The view cannot be displayed because it exceeds the list view threshold (5000 items) enforced by the administrator.
To view items, try selecting another view or creating a new view. If you do not have sufficient permissions to create views for this list, ask your administrator to modify the view so that it conforms to the list view threshold.
Supported and unsupported columns for indexing
Solution #1: Index Columns Used as View Filters
(works for both On-Prem/SharePoint Server AND O365/SharePoint Online)
1) Filter all views so that they cannot return more than the threshold limit (such as [Created] is greater than or equal to [Today]-120 to only return the last four months of data)
 2) Index all columns used in list view filters ([Created], [Department], [Location], [Agent], etc.) You can index up to 20 columns. ShareGate also recommends indexing the first column in each list view.

The view cannot be displayed because it exceeds the list view threshold (5000 items) enforced by the administrator.
To view items, try selecting another view or creating a new view. If you do not have sufficient permissions to create views for this list, ask your administrator to modify the view so that it conforms to the list view threshold.
Supported and unsupported columns for indexing
Supported Column Types
|
Unsupported Column Types
|
Solution #1: Index Columns Used as View Filters
(works for both On-Prem/SharePoint Server AND O365/SharePoint Online)
1) Filter all views so that they cannot return more than the threshold limit (such as [Created] is greater than or equal to [Today]-120 to only return the last four months of data)

- Go to List Settings
- Under “Columns” select “Indexed Columns”
- Click “Create a new index”
- Change primary column to the column on which you’re filtering and click Create

5. Repeat steps 3-4 for each column used as a view filter on the list.
Solution #2: Increase the Threshold
(On-Prem/SharePoint Server Only)
- Go to Central Admin
- Under “Application Management” click “Manage Web Applications”
- Select the web application for which you’re adjusting the list view threshold
- Select “General Settings” then “Resource Throttling”
- Change the limit and click OK.
- Check the result by going to “List Settings” for any list on that web application
O365/SharePoint Online Limitations
- Cannot modify list view thresholds
- Cannot create a Daily Time Window
Multiple ways to overcome this challenge and retrieve the data from the list.
When we index a column, we are requesting SharePoint to make that column more available and executable in a query when compared to other columns.
We should be aware that this prioritization comes at a cost, which is an increased overhead at the database level. Therefore, it is advisable to index columns that are going to be searched and filtered very frequently.
The concept behind the filtering of views is to exclude irrelevant items within a list. To make a filtered view more relevant, it’s required for the first column within the list to be indexed to keep the returned rows or items below the view threshold.
OData:
In OData queries, generally when querying lists items without filter, then it works fine irrespective of count of items in the list. But the problem arises when we need to add a filter in OData query based on some business requirements and when the item count in the list is more than 5000 records. It gives threshold limit error.
To overcome this, we need to index columns used for filtering the results in the OData query. But, we also need to see that after filtering query over the indexed column, the result should not be greater than 5000 records else, we will have to implement more filters using indexed columns to keep count well below 5000 records. Indexing to be done in the same way as discussed above for the required columns.
Example: /_api/web/lists/getbytitle(‘’)/items?$filter=Column1 eq 2
In the above OData query, Column1 must be indexed column if the total number of items in the list is greater than 5000 records.
Lessons learned: if you want to use indexed columns to overcome the 5000 items list view threshold, you need to keep the following in mind:
- You can only have 20 indexed columns per list. Plan thoughtfully!
- You can't create an indexed column if the list is already hitting the list view threshold.
- If you use additional sorting in a view, the sort column also needs to be an indexed column.
- Review the list items and check if some can be deleted or archived to another list.
Friday, May 15, 2020
Break Inheritance And Add Role Permissions Using REST API In SharePoint
Ans:- Inheritance of permissions is one of the security features that come out of the box in SharePoint. Whenever a new item is created, by default, it inherits the permissions of the parent, unless specifically unique permissions are assigned to it. When a list item is created, it will inherit the permissions of its parent list. Similarly, when a Web is created, it will inherit the parent Web’s permissions.
We can implement this from UI directly. In order to do that we can navigate to the permissions management section of the Library/List Library. Settings -> Permissions for this Document Library.

Clicking on Stop Inheriting Permissions will grant unique permissions to the document library.
let’s break the inheritance using the BreakRoleInheritance method of REST API.
Say if my site had the URL: http://c293106922:1500, then the breakroleinheritance rest URL will look like:
“http://c293106922:1500/_api/web/lists/getByTitle('Documents')/breakroleinheritance(copyRoleAssignments=true, clearSubscopes=true)”
If I try to access the above Rest API from the browser it will give me the following error:
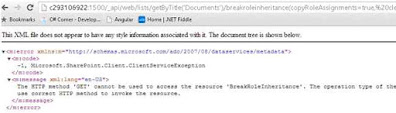 It states clearly that we cannot use GET to issue the rest call. Let’s create the REST header, REST end point and issue a POST request.
The entire rest call to break inheritance will look like the following code snippet:
//Create the REST header
var headers = {
"Accept": "application/json;odata=verbose",
"content-Type": "application/json;odata=verbose",
"X-RequestDigest": jQuery("#__REQUESTDIGEST").val()
}
//Create the REST end point URL
var endPointUrl = "http://c293106922:1500/" + "_api/web/lists/getByTitle('Documents')/breakroleinheritance(copyRoleAssignments=true, clearSubscopes=true)";
//Issue the REST Call
var call = jQuery.ajax({
url: endPointUrl,
type: "POST",
headers: headers,
dataType: 'json',
success: function (data) {
alert(‘Inheritance Broken Successfully !');
},
error: function (error) {
alert(JSON.stringify(error));
}
});
Once the breakroleinheritance call is issued the child’s inheritance will lost and it will not have unique permissions.

Now let’s see how to assign Full Control permissions to the existing group SP2016 Test Members in the List using the method addroleassignment of REST API.
The rest API for this will look like: “http://c293106922:1500/_api/web/lists/getByTitle('Document')/roleassignments/addroleassignment(principalid=20,roleDefId=1073741828)“
There are two parameters whose values we need to know to issue the REST call.
Principalid
RoleDefid
Here Pricipalid is the id of the user/group to which we are going to assign Role Permissions.
This id can be obtained from browser by issuing a GET request as below:
http://c293106922:1500/_api/web /siteusers - to get the id of a user
http://c293106922:1500/_api/web /sitegroups - to get the id of a group
 o our group SP2016 has an id of 8.
The second parameter is the RoleDefid which is the id of the Role Permission (Full Control, Edit, etc.)
We can get the id of the Role permission using the following GET request in the browser.
http://c293106922:1500/_api/web/roledefinitions
 Thus full control has the id of : 1073741829.
Now we are all set to issue a POST REST call to add the Full Control Role Permission to SP2016 Test Members group.
var headers = {
"Accept": "application/json;odata=verbose",
"content-Type": "application/json;odata=verbose",
"X-RequestDigest": jQuery("#__REQUESTDIGEST").val()
}
var endPointUrlRoleAssignment = "http://c293106922:1500/" + "_api/web/lists/getByTitle('Documents')/roleassignments/addroleassignment(principalid=8,roleDefId=1073741829)";
var call = jQuery.ajax(
{
url: endPointUrlRoleAssignment,
type: "POST",
headers: headers,
dataType: 'json',
success: function (data)
{
alert(Role Permission Added successfully!');
},
error: function (error)
{
alert(JSON.stringify(error));
}
});
We can implement this from UI directly. In order to do that we can navigate to the permissions management section of the Library/List Library. Settings -> Permissions for this Document Library.

Clicking on Stop Inheriting Permissions will grant unique permissions to the document library.
let’s break the inheritance using the BreakRoleInheritance method of REST API.
Say if my site had the URL: http://c293106922:1500, then the breakroleinheritance rest URL will look like:
“http://c293106922:1500/_api/web/lists/getByTitle('Documents')/breakroleinheritance(copyRoleAssignments=true, clearSubscopes=true)”
If I try to access the above Rest API from the browser it will give me the following error:

The entire rest call to break inheritance will look like the following code snippet:
//Create the REST header
var headers = {
"Accept": "application/json;odata=verbose",
"content-Type": "application/json;odata=verbose",
"X-RequestDigest": jQuery("#__REQUESTDIGEST").val()
}
//Create the REST end point URL
var endPointUrl = "http://c293106922:1500/" + "_api/web/lists/getByTitle('Documents')/breakroleinheritance(copyRoleAssignments=true, clearSubscopes=true)";
//Issue the REST Call
var call = jQuery.ajax({
url: endPointUrl,
type: "POST",
headers: headers,
dataType: 'json',
success: function (data) {
alert(‘Inheritance Broken Successfully !');
},
error: function (error) {
alert(JSON.stringify(error));
}
});
Once the breakroleinheritance call is issued the child’s inheritance will lost and it will not have unique permissions.

Now let’s see how to assign Full Control permissions to the existing group SP2016 Test Members in the List using the method addroleassignment of REST API.
The rest API for this will look like: “http://c293106922:1500/_api/web/lists/getByTitle('Document')/roleassignments/addroleassignment(principalid=20,roleDefId=1073741828)“
There are two parameters whose values we need to know to issue the REST call.
Principalid
RoleDefid
Here Pricipalid is the id of the user/group to which we are going to assign Role Permissions.
This id can be obtained from browser by issuing a GET request as below:
http://c293106922:1500/_api/web /siteusers - to get the id of a user
http://c293106922:1500/_api/web /sitegroups - to get the id of a group

The second parameter is the RoleDefid which is the id of the Role Permission (Full Control, Edit, etc.)
We can get the id of the Role permission using the following GET request in the browser.
http://c293106922:1500/_api/web/roledefinitions

Now we are all set to issue a POST REST call to add the Full Control Role Permission to SP2016 Test Members group.
var headers = {
"Accept": "application/json;odata=verbose",
"content-Type": "application/json;odata=verbose",
"X-RequestDigest": jQuery("#__REQUESTDIGEST").val()
}
var endPointUrlRoleAssignment = "http://c293106922:1500/" + "_api/web/lists/getByTitle('Documents')/roleassignments/addroleassignment(principalid=8,roleDefId=1073741829)";
var call = jQuery.ajax(
{
url: endPointUrlRoleAssignment,
type: "POST",
headers: headers,
dataType: 'json',
success: function (data)
{
alert(Role Permission Added successfully!');
},
error: function (error)
{
alert(JSON.stringify(error));
}
});
Upon successful completion we can see the extra role permission added to our group:
The complete REST call for breaking inheritance and then adding Role assignments is as below:
Here role assignment REST call is issued from the success method of the Break Role Inheritance Ajax call, so that both happen sequentially.
script type="text/javascript" src="https://ajax.googleapis.com/ajax/libs/jquery/2.1.3/jquery.min.js"></script>
script type="text/javascript">
$(document).ready(function ()
//Create REST header
var headers = {
"Accept": "application/json;odata=verbose",
"content-Type": "application/json;odata=verbose",
"X-RequestDigest": jQuery("#__REQUESTDIGEST").val()
}
var BreakInheritance = function(){
//Create breakinheritance REST url
var endPointUrl = ”http: //c293106922:1500/" + "_api/web/lists/getByTitle('Documents')/breakroleinheritance(copyRoleAssignments=true, clearSubscopes=true)";
//Issue the REST call
var call = jQuery.ajax(
{
url: endPointUrl,
type: "POST",
headers: headers,
dataType: 'json',
success: function (data)
{
alert(‘Inheritance Broken Successfully!');
AssignPermission();
},
error: function (error)
{
alert(JSON.stringify(error));
}
});
});
}
var AssignPermission= function(){
//Add Role Permissions
var endPointUrlRoleAssignment = "http://c293106922:1500/" + "_api/web/lists/getByTitle('Documents')/roleassignments/addroleassignment(principalid=8,roleDefId=1073741829)";
var call = jQuery.ajax(
{
url: endPointUrlRoleAssignment,
type: "POST",
headers: headers,
dataType: 'json',
success: function (data)
{
alert('Role Permission Added successfully !');
},
error: function (error)
{
alert(JSON.stringify(error));
}
});
}
BreakInheritance();
</script>
Subscribe to:
Comments (Atom)